

ประกันรถยนต์ชั้น 1 เป็นระดับประกันที่ครอบคลุมความเสียหายและความเสียหายที่เกิดขึ้นกับรถยนต์ของคุณอย่างแบบครอบคลุมที่สุด มันมักจะมีการคุ้มครองต่อความเสียหายที่เกิดจากอุบัติเหตุทุกชนิด รวมถึงความเสียหายที่เกิดขึ้นจากสภาพภูมิอากาศที่เป็นธรรมชาติ
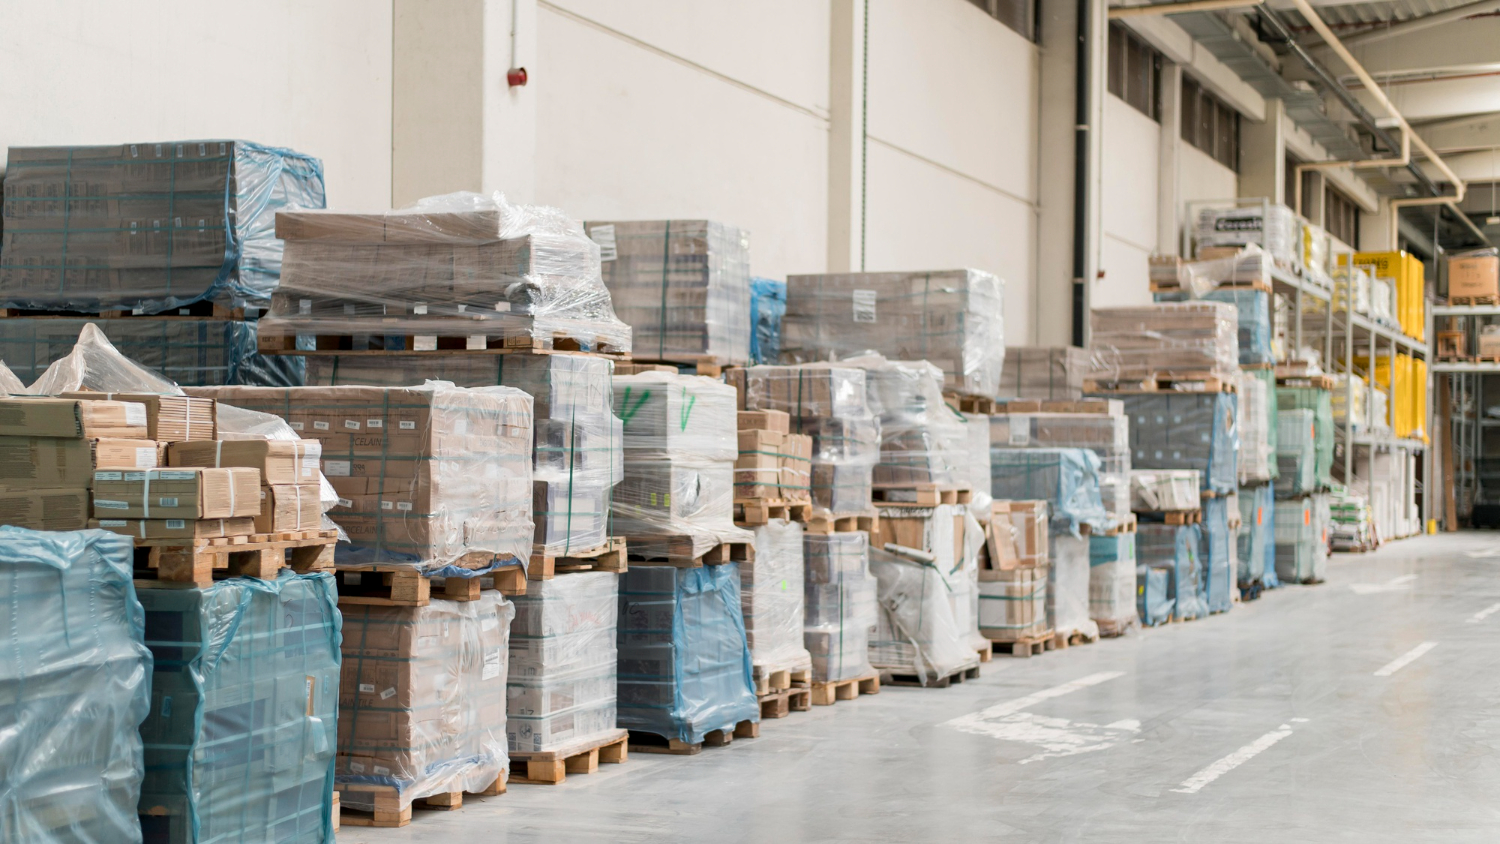
โกดังให้เช่ากรุงเทพ ข้อควรรู้ก่อนทำสัญญาเช่าโกดัง โกดังให้เช่ากรุงเทพ ข้อควรรู้ก่อนทำสัญญาเช่าโกดัง
ปฏิเสธไม่ได้เลยว่า การเช่าโกดังให้เช่ากรุงเทพ หรือการเช่าคลังสินค้า ได้กลายเป็นทางเลือกใหม่ของนักธุรกิจและผู้ประกอบการหลาย ๆ คนเลยก็ว่าได้ เพราะการเช่าสถานที่เหล่านี้ จะเป็นตัวช่วยเพิ่มความประหยัดค่าใช้จ่ายได้มากกว่า อีกทั้งยังให้ความสะดวกสบายในการทำธุรกิจอีกด้วย แต่หนึ่งข้อสำคัญก่อนเลือกเช่าโกดังหรือคลังสินค้านั้น

รับผลิตสินค้าแจก ได้งานพรีเมียม ถูกใจทั้งผู้ให้และผู้รับรับผลิตสินค้าแจก ได้งานพรีเมียม ถูกใจทั้งผู้ให้และผู้รับ
คุณกำลังมองหาร้านรับผลิตสินค้าแจกกันอยู่ใช่หรือไม่? สินค้าแจก หรือที่เราเรียกกันว่าของชำร่วย และของที่ระลึก นั่นเอง ถือว่าเป็นของขวัญชิ้นสำคัญที่ใช้มอบให้แขกคนพิเศษของคุณ เพื่อเป็นการตอบแทนน้ำใจ และช่วยทำให้แขกคนพิเศษเกิดความประทับใจที่ได้มางานของคุณได้ไม่ยาก การแจกของชำร่วย และของที่ระลึก สามารถนำไปแจกได้ในทุกโอกาส เช่น งานสัมมนา งานแต่งงาน งานบวช หรือแม้แต่ธุรกิจร้านค้า ที่เจ้าของกิจการนำไปใช้แจกเพื่อเอาใจลูกค้า นอกจากนี้ของแจกของชำร่วย และของที่ระลึกแต่ละชิ้น ยังแฝงไปด้วยความหมายที่ดีอีกด้วย เพื่อทำให้ทั้งผู้ให้และผู้รับเกิดความรู้สึกประทับใจกันทั้งสองฝ่ายนั่นเอง ดูร้านรับผลิตสินค้าแจกยังไง ให้ได้งานพรีเมียม การสั่งสินค้าแจกกับร้านรับผลิตสินค้าแจกในยุคโซเชียลมีเดียแบบนี้ มีบริการที่ช่วยอำนวยความสะดวกให้คุณได้อย่างมาก เพราะคุณไม่จำเป็นต้องเดินทางไปถึงหน้าร้านก็ได้ เพียงแค่คุณดูรูป

ต้อกระจก เกิดจากอะไร ข้อมูลน่ารู้เกี่ยวกับโรคตา ต้อกระจก เกิดจากอะไร ข้อมูลน่ารู้เกี่ยวกับโรคตา
ต้อกระจก คือ ภาวะที่เลนส์ตาตามธรรมชาติเกิดความขุ่นมัว โดยภาวะขุ่นมัวนี้มักเกี่ยวข้องกับความชราเป็นหลัก คนเราเมื่อมีอายุมากขึ้นก็มีความเสี่ยงในการเป็นโรคต้อกระจกมากขึ้น แต่ถึงกระนั้นก็มีปัจจัยอื่น ๆ อีกมากมาย ที่มีส่วนทำให้เกิดหรือเร่งการเกิดต้อกระจกได้ ซึ่งเราได้นำสาเหตุและปัจจัยเสี่ยงบางประการสำหรับการเกิดต้อกระจกมาแนะนำกันแล้ว สาเหตุหลักของการเกิด ต้อกระจก นอกเหนือไปจากอายุที่เพิ่มมากขึ้นแล้ว ก็มีสาเหตุหลักอีกหลายประการที่ทำให้เกิดโรคต้อกระจก อย่างไรก็ตาม ถึงแม้ว่าปัจจัยเหล่านี้สามารถเพิ่มโอกาสในการเกิดต้อกระจกได้ แต่ไม่ใช่ทุกคนที่มีปัจจัยเสี่ยงเหล่านี้ที่จะเป็นโรคต้อกระจก และภาวะต้อกระจกสามารถเกิดขึ้นได้ ถึงแม้ว่าจะไม่มีปัจจัยเสี่ยงเหล่านี้ก็ตาม การตรวจตาเป็นประจำกับจักษุแพทย์จะทำให้คุณพบปัญหาต้อกระจกได้ตั้งแต่เนิ่น ๆ ทำให้สามารถเข้ารับการรักษา และรักษาได้ทันท่วงทีหากจำเป็น

สว่านไฟฟ้า ผู้ช่วยชั้นดีของงานช่างสว่านไฟฟ้า ผู้ช่วยชั้นดีของงานช่าง
ในโลกของการก่อสร้าง เครื่องมือหนึ่งที่โดดเด่นก็คือ สว่านไฟฟ้า เครื่องมืออเนกประสงค์และทรงพลังนี้ได้ปฏิวัติวิธีการทำงานของเรา ทำให้งานที่ครั้งหนึ่งเคยต้องใช้ความพยายามและใช้เวลานาน ง่ายดาย และมีประสิทธิภาพมากขึ้น ตั้งแต่การเจาะรูไปจนถึงการขันสกรู สว่านไฟฟ้าได้กลายเป็นเครื่องมือที่ขาดไม่ได้สำหรับมืออาชีพและผู้ที่ชื่นชอบงาน DIY ประวัติความเป็นมาของสว่านไฟฟ้า แนวคิดของการเจาะรูมีมานับพันปี จนกระทั่งช่วงปลายศตวรรษที่ 19 จึงมีผู้ประดิษฐ์สว่านไฟฟ้าเครื่องแรกขึ้น Arthur James Arnot นักประดิษฐ์ชาวเมลเบิร์นได้จดสิทธิบัตรสว่านไฟฟ้าเครื่องแรกในปี 1889 การออกแบบเบื้องต้นนี้วางรากฐานสำหรับสว่านไฟฟ้าสมัยใหม่ที่เราใช้อยู่ในปัจจุบัน การทำงานของสว่านไฟฟ้า สว่านไฟฟ้า ใช้พลังงานไฟฟ้า และมีหัวจับแบบหมุนที่ใช้ยึดดอกสว่านหรือดอกไขควงต่าง ๆ เมื่อกดไกปืน มอเตอร์ไฟฟ้าจะหมุนหัวจับ เพื่อให้ดอกสว่านเจาะวัสดุที่กำลังทำอยู่ได้ โดยปกติความเร็วและแรงบิดของสว่านสามารถปรับได้

ดัชนีดอลล่าร์ คืออะไร และทำไมต้องมีการเทรดด้วยดัชนีดอลล่าร์ ดัชนีดอลล่าร์ คืออะไร และทำไมต้องมีการเทรดด้วยดัชนีดอลล่าร์
ดัชนีดอลล่าร์ คือ หนึ่งในสกุลเงินที่มีความสำคัญที่สุด เป็นสกุลเงินที่มีอิทธิพลต่อการเคลื่อนไหว แต่ค่าเงินดอลล่าร์ก็จะเหมือนกับสกุลเงินอื่น ๆ ทั่วไป ที่จะต้องมีการเปรียบเทียบตัวเองกับสกุลอื่นนั้นมันขึ้นอยู่กับมูลค่าว่าอยู่ที่เท่าไหร่ อย่างเช่นการเปรียบเทียบเป็นยูโร และเพื่อความสะดวกสบายไม่ต้องทำการติดตาม จึงได้มีการพัฒนาดัชนีเพื่อให้แสดงค่าเงิน และให้สามารถติดตามความเคลื่อนไหวของค่าเงินอย่างสะดวก จึงเรียกว่าดัชนีดอลล่าร์ ซึ่งกลายเป็นดัชนีที่เป็นที่จับตามองโดยเทรดเดอร์ ผู้จัดการทางกองทุน ทางบริษัท รวมไปถึงรัฐบาลต่าง ๆ ดัชนีดอลล่าร์ คืออะไร ทำไมถึงมีคนสนใจ ดัชนีดอลล่าร์ คือ การแสดงถึงมูลค่าโดยรวมของสกุลเงินดอลล่าร์สหรัฐ ซึ่งอาจจะมีการเรียกต่างกันในหลากหลายรูปแบบ ซึ่งดัชนีดอลลาร์จะเป็นดัชนีที่สามารถคำนวณค่าเงินดอลลาร์สหรัฐและเปรียบเทียบกับค่าเงินต่าง ๆ ทั่วโลกได้ และนอกจากนี้ยังมีความสัมพันธ์กับราคาของทองคำอีกเป็นจำนวนมาก ดังนั้นดัชนีดอลล่าร์ก็อยู่ภายใต้การดำเนินงานของ

อาชีพที่ต้องมีใบอนุญาตทำงานในประเทศไทย รับทำใบอนุญาตทำงาน อาชีพที่ต้องมีใบอนุญาตทำงานในประเทศไทย รับทำใบอนุญาตทำงาน
ประเทศไทยซึ่งเป็นที่รู้จักในด้านวัฒนธรรมที่มีชีวิตชีวา ภูมิทัศน์ที่สวยงาม และการต้อนรับอันอบอุ่น ได้กลายเป็นจุดหมายปลายทางที่น่าดึงดูดสำหรับผู้คนจากทั่วทุกมุมโลกที่กำลังมองหาโอกาสในการจ้างงาน แต่ก่อนที่จะจัดกระเป๋าและมุ่งหน้าไปยังดินแดนแห่งรอยยิ้ม สิ่งสำคัญคือต้องทำความเข้าใจกฎระเบียบที่เกี่ยวข้องกับใบอนุญาตทำงาน ในบทความนี้ เราจะสำรวจอาชีพที่ต้องมีใบอนุญาตทำงานในประเทศไทย และให้ความกระจ่างเกี่ยวกับกระบวนการที่เกี่ยวข้อง เพราะเราคือผู้ให้บริการรับทำใบอนุญาตทำงานมืออาชีพ ความสำคัญของใบอนุญาตทำงาน ใบอนุญาตทำงานเป็นเอกสารทางกฎหมายที่ออกโดยรัฐบาลไทยที่อนุญาตให้ชาวต่างชาติทำงานในประเทศได้ โดยทำหน้าที่เป็นข้อพิสูจน์ว่าบุคคลได้รับอนุญาตให้มีส่วนร่วมในกิจกรรมการจ้างงานและปกป้องทั้งลูกจ้างและนายจ้าง หากไม่มีใบอนุญาตทำงานที่ถูกต้อง การทำงานในประเทศไทยอาจนำไปสู่ผลกระทบร้ายแรง รวมถึงค่าปรับ การเนรเทศ และการห้ามกลับเข้าประเทศอีกครั้ง และเพื่อลดความยุ่งยากในการยื่นเอกสาร คุณสามารถเลือกใช้บริการรับทำใบอนุญาตทำงานแทนได้ อาชีพที่ต้องมีใบอนุญาตทำงาน ในประเทศไทย อาชีพบางอาชีพจำกัดเฉพาะผู้มีสัญชาติไทยเท่านั้น ในขณะที่อาชีพอื่น ๆ กำหนดให้ชาวต่างชาติต้องมีใบอนุญาตทำงาน กระทรวงแรงงานได้แบ่งอาชีพออกเป็น 3 ประเภทตามระดับทักษะที่ต้องการ ขั้นตอนการขอใบอนุญาตทำงาน

ESG คืออะไร มีความสำคัญในที่ทำงานอย่างไรบ้าง ESG คืออะไร มีความสำคัญในที่ทำงานอย่างไรบ้าง
นโยบายขององค์หรือบริษัทใดที่ใช้หลัก ESG คือผู้ที่จะสามารถพัฒนาให้ธุรกิจของตนเติบโตขึ้นได้อย่างแน่นอน กลยุทธ์นี้เริ่มปรากฏขึ้นและประสบความสำเร็จอย่างยิ่งใหญ่เมื่อช่วยปี 1960
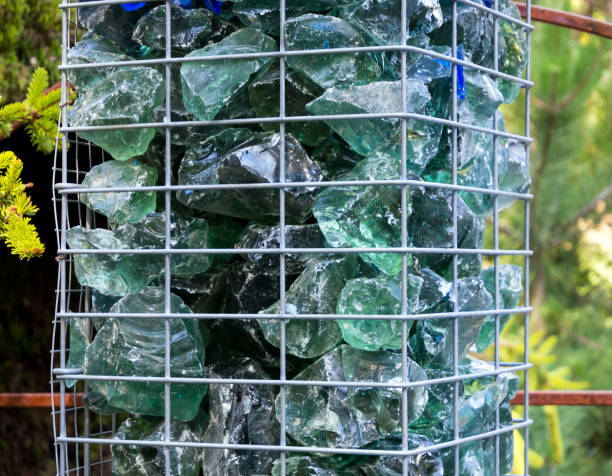
ประโยชน์ของกล่องลวดตาข่ายแมทเทรสประโยชน์ของกล่องลวดตาข่ายแมทเทรส
หากว่าเอ่ยถึงกล่องแมทเทรส เชื่อได้เลยว่าหลายๆ คนย่อมคุ้นหูและคุ้นตากันเป็นอย่างดี ส่วนหนึ่งก็เนื่องจากว่าเป็นกล่องที่ช่วยในด้านของการปกป้องดินจากการกัดเซาะ หรือปัญหาตลิ่งพัง เป็นต้น อย่างไรก็ดีหากว่าคุณเป็นอีกคนหนึ่งที่ต้องการเลือกกล่องลวดตาข่ายชนิดนี้เพื่อก่อให้เกิดประโยชน์สูงสุด มาดูพร้อมๆ กันดีกว่าหรือไม่ว่ากล่องลวดตาข่ายชนิดนี้มีประโยชน์ใดบ้าง พร้อมแล้วมาดูกันเลย อะไรคือกล่องลวดตาข่ายแมทเทรส สำหรับกล่องชนิดนี้จัดได้ว่าเป็นกล่องทรงสี่เหลี่ยมที่มีการทำจากลวดตาข่ายที่ถักหรือชุบสังกะสีสำหรับกันสนิมและมีการเคลือบพีวีซีเอาไว้ด้วย โดยจะนำมาผูกติดกัน จากนั้นก็จะค่อยๆ ใส่ก้อนหินเข้าไว้ภายใน สำหรับป้องกันการกัดเซาะชายฝั่งได้อย่างมีคุณภาพ กล่องเกเบี้ยน (Gabion Box) การใช้งานกล่องลวดตาข่ายแมทเทรสจะมีข้อสังเกตคือ ช่องตาข่ายจะมีลักษณะหกเหลี่ยม โดยเป็นการป้องกันการพังทลายของพื้นที่ลาดชัน โดยจะทำจากลวดชุบสังกะสีหรือหุ้มพีวีซี อย่างไรก็ดีลักษณะการใช้งาน จะใช้เพื่อการรักษาหน้าดิน ป้องกันดินพังทลาย หรือเสริมสร้างเสถียรภาพของตลิ่งหรือแม่น้ำสำหรับกันคลื่น สถานที่สำหรับใช้งานกล่องลวดตาข่ายแมทเทรส สำหรับสถานที่ในการใช้งานกล่องเกเบี้ยน มีดังต่อไปนี้

ร้านเพชรแท้ ขายเพชร Rose Cut Diamond เป็นเพชรแบบไหน ร้านเพชรแท้ ขายเพชร Rose Cut Diamond เป็นเพชรแบบไหน
ปัจจุบันคุณสามารถหาซื้อเพชรแท้หรือเครื่องประดับเพชรอัญมณีที่มีค่าได้กับร้านเพชรแท้ ไม่ว่าจะเป็นร้านเพชรที่มีหน้าร้าน ร้านเพชรแท้ที่จำหน่ายในห้างหรือสั่งซื้อผ่านช่องทางออนไลน์แต่ต้องเลือกร้านที่เชื่อถือได้เท่านั้น แล้วคุณเคยสงสัยไหมว่า ร้านเพชรแท้ ขายเพชร Rose Cut Diamond เป็นเพชรแบบไหน ต้องบอกเลยว่ามันเป็นเพชรเทรนใหม่ที่กำลังถูกจับตามองและเป็นที่สนใจในปัจจุบัน เพชรโรส คัท คืออะไร ต้องขอเล่าเท้าความก่อนว่า เพชรทรงกลมส่วนใหญ่ที่เราพบเห็นกันในปัจจุบันมักมีการเจียระไนด้วย Pattern แบบเดียวกันเรียกว่า Brilliant Cut Diamond หรือ บริลเลียน คัท เพชรเหลี่ยมเกสรนั่นเอง บางคนต้องการความแตกต่างไปจากเดิม เพชรโรส คัท หรือ Rose